
How I Use Notion for Project Management
I think many people’s (myself included) first use case for Notion, is to build some form of repository or library or resources. A place to save links or take notes. I’ve already spoken about personal knowledge management in Notion and have built a Notion PKM system to boot. That said, one of my favourite use cases for Notion is as a task and project management system. Notion's relation features lets you see each project along with its related tasks, resources, notes, and meetings. Furthermore, you can view projects on context-based dashboards, filtered according to timeline, subject, team, and other parameters.
I do a lot of work in web design, both freelance and in my day job. The more work in this space I’ve done, the more I’ve relied on having supporting systems in place. Tracking progress, clearly defining deliverables, If you were to sample 100 web designers and ask them to track how much of the time they spent working on a web design project, actually designing and building the website, I would say the vast majority would be less than 20%. The amount of time spent in email threads, managing stakeholders, chasing content really adds up. I became a little obsessed with this idea and started building a lot of systems and processes to try claim back some of that time. My project management system is a core element of my web design process but I also use it to manage other projects like creation Notion templates or personal projects.
The system is built around a number of interrelated databases. These are:
Projects: This is the hub of the system. Project timelines, blockers and versions are managed through here and related elements (tasks, resources, notes) can be viewed within the contextual project dashboard.
Tasks: Tasks can be related to individual projects or managed independently of projects in the Tasks hub. Tasks can be organised and managed with action dates, blockers for prioritisation.
Library: Resources are captured into the library and organized and related to their project. If you integrate with the PKM system additional there is built in functionality to distill resources into individual clippings.
Reflections: Reflections are used primarily in the project retro section to capture lessons learned as well as what went well in the project to improve on future work and processes.
Notes: Notes can be use to capture all other documentation related to a project. They can be used to define the project scope, to capture risks and keep a decision log.
Any Notion system I create is built around 2 core principles, put succinctly by Notion expert, Will Nutt “centralize your information in interrelated master databases. Then, create filtered views of that information within contextual dashboards.” Let’s explore the system to see how these principles come into play.
Navigating the Project Hub
Current Projects
This gallery view shows projects that are currently In Progress. This view gives you quick access to project pages and shows you the actual timeline of the project and the current progress completion rate.

Current Projects view in Notion Project Management Kit
Current Project Tasks
This section shows tasks related to projects that are currently in progress. This section is particularly useful if you are managing multiple projects at the same time. You can easily view all active project tasks and schedule accordingly without needing to open multiple project pages. There are 2 views in this section. The Task Calendar and the Task List.
Task Calendar
This calendar view shows incomplete, project related parent **tasks. Sub-tasks do not display in this view by default, to prevent the view from being too cluttered. In this template sub-tasks are designed to be checklist items to complete the parent task, Sub-tasks are generally not designed to have an Action Date. However, you can configure this to suit your own needs.
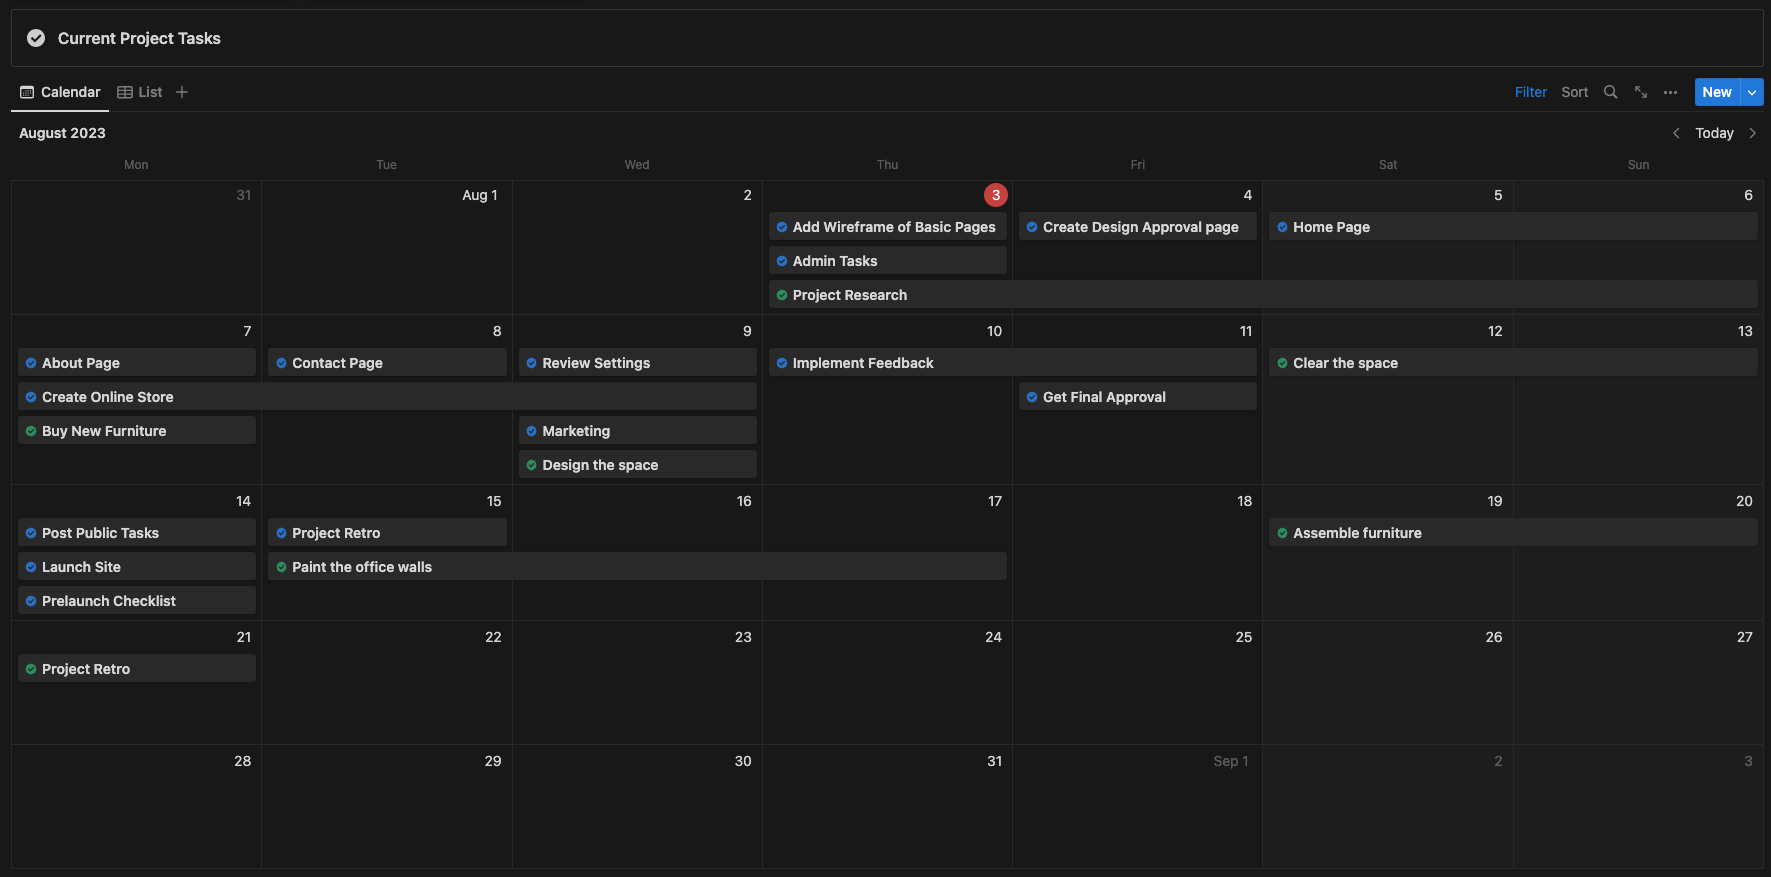
Current Project Tasks Calendar View in Notion Project Management
Task List
This table view shows incomplete, project related tasks. Sub-tasks display as sub-items in this view. Tasks are grouped by project.
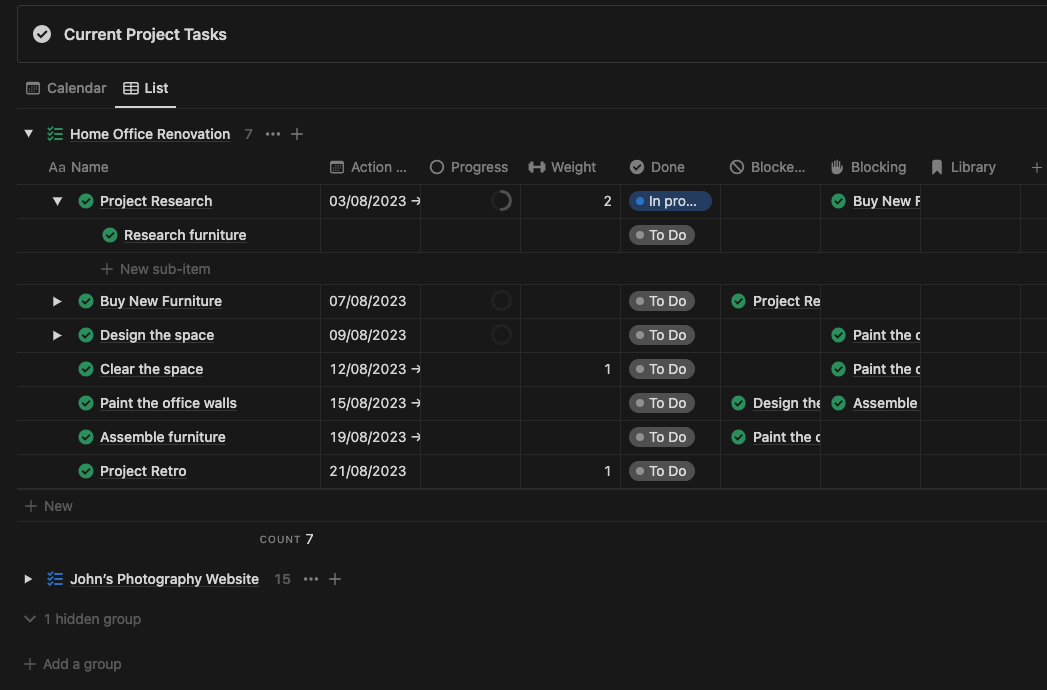
Current Project Tasks Table View, including sub-tasks in Notion Project Management
Project Timeline
This section shows multiple timeline views for all projects in the pipeline. Projects that are not marked as Complete and have data in the Projected, Revised and Actual timeline properties (more on that later) will populate in their respective views.
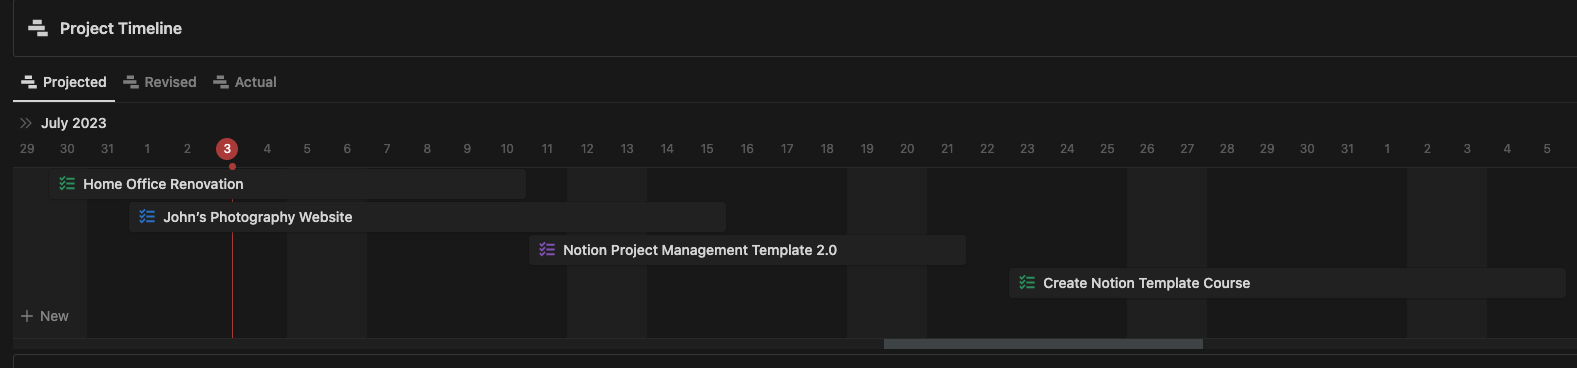
Project timeline view in the Notion Project Management Kit
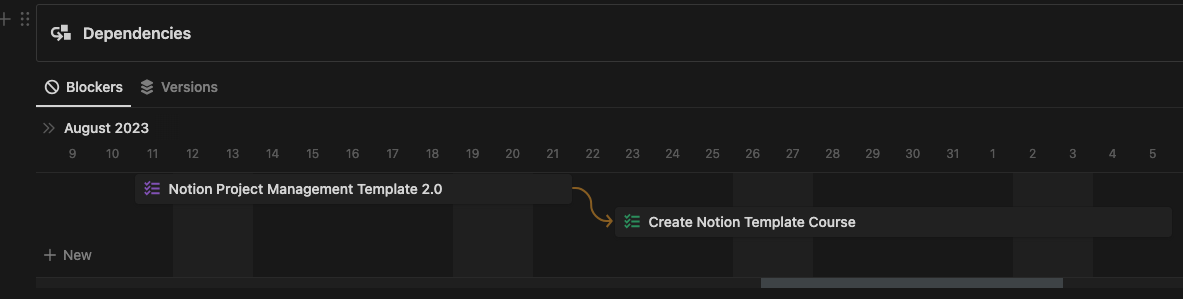
Dependencies
This section shows multiple timeline views for all projects in the pipeline that have dependencies. Projects that have a projected timeline and have data in the Blocked By, Blocking, Previous Version, Next Version properties, will populate in their respective views.
Project Dependencies view in Notion Project Management Kit
Note: Dependency timeline views are populated with the Projected Timeline property by default. You could also configure this with the Revised Timeline or using the Actual Start Date and Actual End Date properties.
Blockers
This timeline view shows projects that are currently blocking or being blocked by another project using the timeline view dependency feature. To avoid clutter, only projects that are Blocked By or Blocking another project populate in this view.

Project Blockers view in Notion Project Management Kit
Versions
This timeline view shows projects that have a previous version or a subsequent version. Project versions are shown using the timeline view dependency feature. To avoid clutter, only projects that have a Previous Version or Next Version will populate in this view.
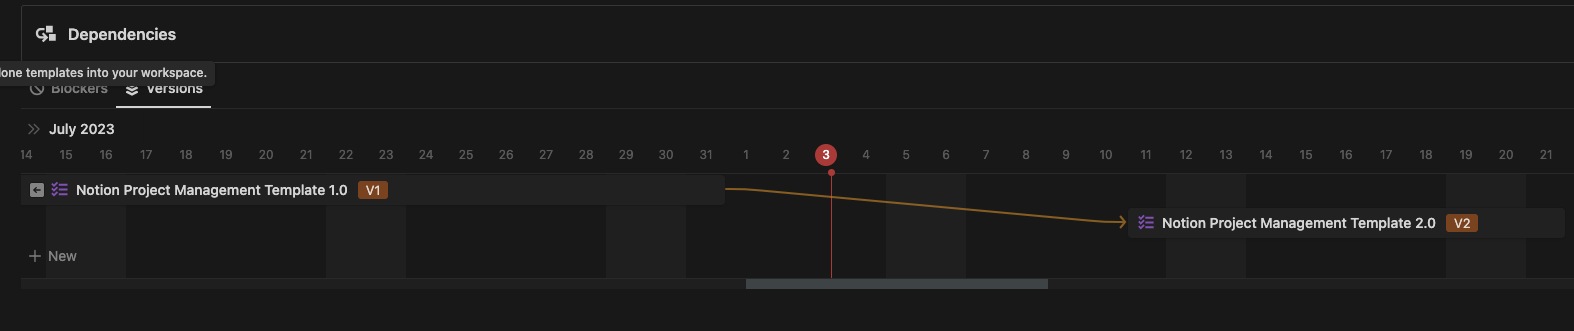
Project Versions view in Notion Project Management Kit
Kanban
This board view shows projects based on the project Status. It is made up of columns for each stage; Blocked, Backlog, Not Started, In Progress & Complete. Projects in the Backlog versus Not Started Projects can be distinguished by the Projected Timeline. Projects that are Not Started have a Projected Timeline set, meaning they will be actioned in the near future. Projects in the Backlog are projects that may be worked on but not in the near future. I review the project Backlog on a quarterly basis for example, to map out the projected timelines for the next quarter.

Kanban board view of projects by status in Notion Project Management Kit
Tip: If the kanban board becomes quite large you could consider hiding the Complete group to make it easier to manage your backlog. Projects can still be manually dragged to Complete. You could also create a separate view to just show your completed projects
Creating a New Project
New projects can be added from any linked view of the project database or the master project database. Keep in mind that projects added to a filtered view of a database would generally have those filters applied. For example, if I add a new project from the Current Projects view, the project Status will automatically be In Progress. The default page type for the Project’s database is Notion’s Empty page type. This means you can apply a template once you open the Project Page. This avoids applying the incorrect template.
Choosing a Project Template
You have access to 3 different project templates when adding a new project. Project Template, Notion Project Template, Website Project Template. Each template has unique tasks and checklists based on the project type. Projects and related tasks are colour coordinated so you can easily identify what tasks are related to which project. Creating a visual relation like this is very helpful in multi-project views like the Project Task Calendar.
Tip: If you’re not interested in colour coordinating projects and their tasks you could consider adding each template’s checklist Button Blocks to one project template. This means you would only need to maintain project template.
Each project template follows the same structure. What distinguishes them is their unique tasks and checklist items (sub-tasks) created with Notion’s button blocks. This section breaks down these unique checklists. Task properties are explored in more detail in Project Tasks and the Task Database guide. Each button can be configured to suit your own needs. Task properties are explored in more detail in Project Tasks and the Task Database guide. Each button can be configured to suit your own needs.
Standard Project Template
Project Research: Creates a parent task to complete project related research. Different project research areas can be added as sub-tasks. Project research materials can be captured in the Project Library.
Project Scope: Create a parent task to complete the project scope. The project scope can be completed by completing the scope template in the Project Notes.
Project Retro: Create a parent task to complete the project retro. The project retro can be completed by completing the scope template in the Project Notes.
Set Icon Colour and Task Template: Task added as a reminder to change the icon colour for tasks added via button blocks and to double check the correct task template is set for the linked database.
Add Project Overview: Task added as a reminder to fill the Project Overview Property. The Project overview is intended to give a very brief summary of the project that can be seen in database views without needing to view the project page. This can be used to include a “Definition of Done” for the project. This clarifies what needs to be achieved to consider the project completed. If you’re collaborating with team members, stakeholders or clients you could include a broader, more descriptive project summary.
Notion Project Template
Create Database: Parent task you can add for each database you want to add for a Notion Project.
Create Database in Master: Sub-task to act as a reminder to keep your master database in your master database page
Tip: Keeping your master databases in a separate section to the rest of your Notion system can help prevent accidentally deleting a database. The database can still be displayed in linked views throughout your Notion workspace.
Add Properties: Sub-task to add notion properties to your database. Each property can be added as a nested sub-task to keep track of what needs to be added.
Audit Properties: Sub-task to keep a log of all database properties, similar to the Properties section of this guide. Sometimes, you’ll create properties for one specific database view, or one specific formula. Noting the context of that property, prevents accidental deletions. Keeping this log can be especially helpful if you intend to publish your Notion templates.
Create Database Page/Template: Parent task you can add for each page or template you want to add to a Notion Project. Includes checklist items for page customization like hiding properties, minimizing comments, setting the page width etc.
Create Linked Database/View: Parent task you can add for each instance of a linked view you want to add to a Notion Project page (a Hub page or template page for example), Includes checklist items to customize filters, sorts, hide excess properties etc.
Create Template Documentation: Parent task to track any documentation needed in relation to a Notion project. This is especially helpful if you are publishing your Notion project. Includes checklist items to create a video tutorial, written guide and marketing materials.
Create Public Template: Parent task to create a public version of your Notion project. Includes checklist items for steps to create a separate version of your Notion project (separate from what you use in your system).
Publish Template: Parent task to publish your Notion project. Includes checklist items to add the project as a product and publish it to different marketing channels.
Website Project Template
Note: These tasks and checklist items are designed with building Squarespace websites in mind. However the same general principles can be applied to any web design project. You can configure the button blocks to tailor to your own web design process.
Website Tasks: Parent task that covers the fundamentals of starting a web design project. Includes comprehensive checklist for creating design concepts. wireframes, admin tasks and getting design approval.
New Page: Parent task that can be added for each new page on a website. Includes checklist items for adding page assets and styling page elements.
Create Online Store: Parent task that runs through the process of creating an online store for a website. Checklist items include creating shipping, fulmittment, tax rules as well as creating template products
Add a Blog: Parent task for creating a new blog on a website. Checklist items include steps to structure your blog page and create blog posts.
Add Google Workspace: Parent task to create Google Workspace account for the site’s domain.
Add Scheduling: Parent task to integrate scheduling functionality with the site.
Create Members Area: Parent task to created gated, members only area on the site.
Marketing: Parent task to complete a full marketing audit of the site. Checklist items include a comprehensive SEO checklist, email campaigns and enabling other marketing features; Instagramming shopping, announcement bars etc.
Settings: Parent task to review all site settings. Checklist items include different setting options; language and region, social links, business information etc.
Client Feedback > Launch: Parent tasks that cover the web design process from implementing client feedback to launch and actions to take after the site is public.
Configure the Button
You can configure each button in each project template to tailor it to your own workflow. To edit an existing button you can follow these steps:
Hover over the button you want to edit and click the gear icon
Add steps to the automation by clicking the plus icon
Edit existing steps by clicking the 3 dots.
Edit and add properties for each step where applicable
Click "Done" to save your changes.
Project Tasks
Primary Properties
The primary properties you see in task views in the project templates are listed below. Task properties are reviewed in more detail in the Task Database guide.
Done: This is a status property that is also displayed as a checkbox in some views. Tasks will generally be marked as To Do, In Progress or Done. The template is designed so that only parent tasks are ever marked as in progress as these are more likely to be larger tasks that could span over multiple days. Views that contain sub-tasks will display the
Donestatus property as a checkbox so that sub-tasks can be easily checked off as you make progressAction Date: This date property is to show the period of time that tasks will be worked on. Tasks that will span multiple days can include a start and end date. This template is designed with the intent that parent tasks will include action dates but sub-tasks will not. This can be configured to meet your own requirements.
Weight: Not all tasks are created equal. The weight property is a numerical value assigned to a task that indicates the effort needed to complete the task. This number is used to calculate the overall project progress. There’s no criteria to how weight is assigned. If working in agile project frameworks the task weight could be an equivalent to story points. Weight could also be used to estimate the number of days required to complete an example.
Tip: Keep the weight scale simple and set a maximum weight limit like 1-3 or 1-5 for example. If a task takes more effort than what you would equate to your maximum weight consider breaking it down into smaller tasks.
Progress: Measures an individual tasks progress. Calculates the percentage of sub-tasks completed. This calculation does not account for task weight. This template is designed to assign weight to parent tasks but not to individual sub-tasks. Weight assigned to sub-tasks would contribute to the projects progress but would not impact the parent task progress
Blocking: Shows what tasks this task is preventing from being worked on and/or completed
Blocked By: Shows what tasks are preventing this task from being worked on and/or completed
Library: Shows project resources linked to a specific task.
Checklist
The Checklist view is a table view that shows all not complete project parent tasks and their sub tasks. Sub-tasks display as sub-items. This allows for a granular view of all details necessary to progress project tasks and the project overall. The Done property displays as a checkbox to easily mark sub-tasks as complete.
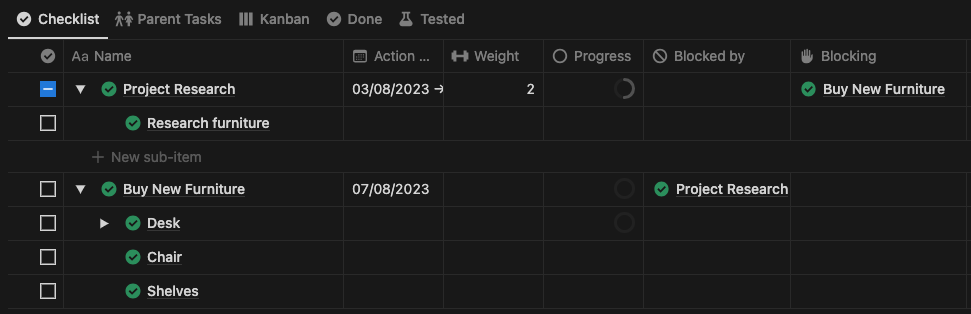
Project Task Checklist in Notion Project Management Kit
Parent Tasks
The Parent Task view is very similar to the Checklist view. The main differences are that sub-tasks do not display and the Done property displays as a status property. This allows for a high level view of the main project tasks. Parent tasks can be easily marked as In Progress in this view.
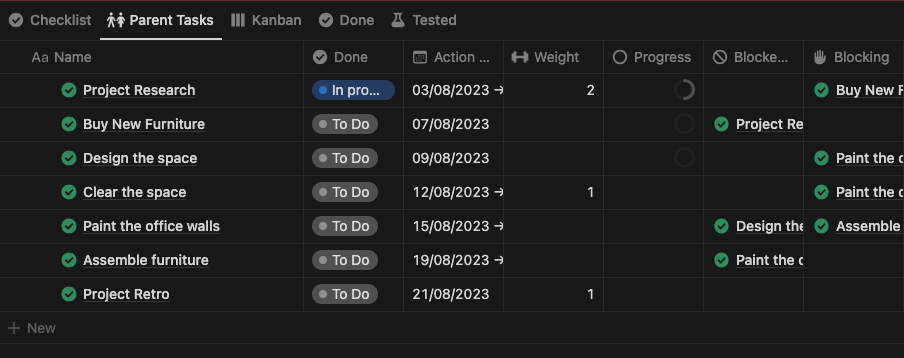
Project Parent Tasks in Notion Project Management Kit
Kanban
The Kanban view is a board view of parent tasks to provide a different visual of which tasks are To Do, In Progress and Completed.
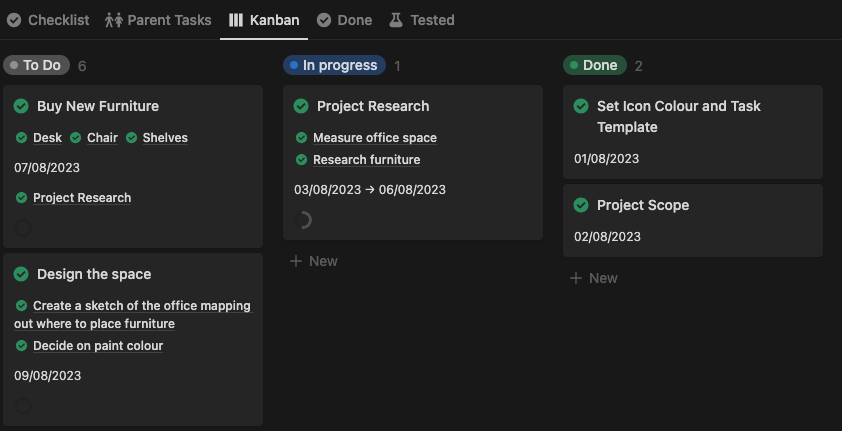
Project tasks kanban view in Notion Project Management Kit
Done
The Done view is a table view of all of the completed project tasks and their sub-tasks. Sub-tasks display as sub-items. You can use the Tested checkbox property to confirm everything is completed correctly prior to launching your project.
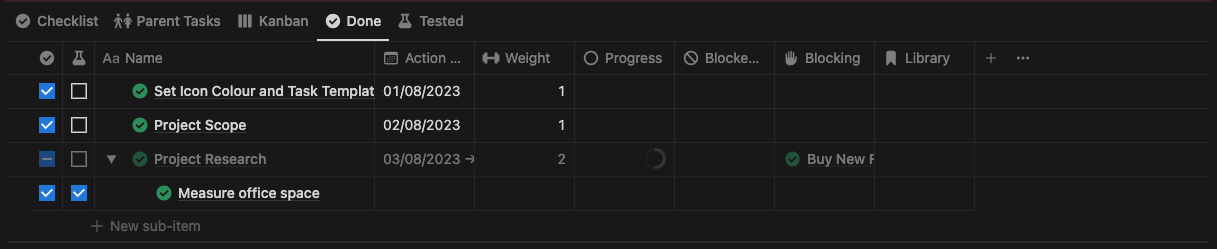
Project tasks Done view in Notion Project Management Kit
Timeframe
This section shows tasks related to projects that are incomplete and have an Action Date assigned to them. These tasks can be viewed in a Calendar or Timeline View.
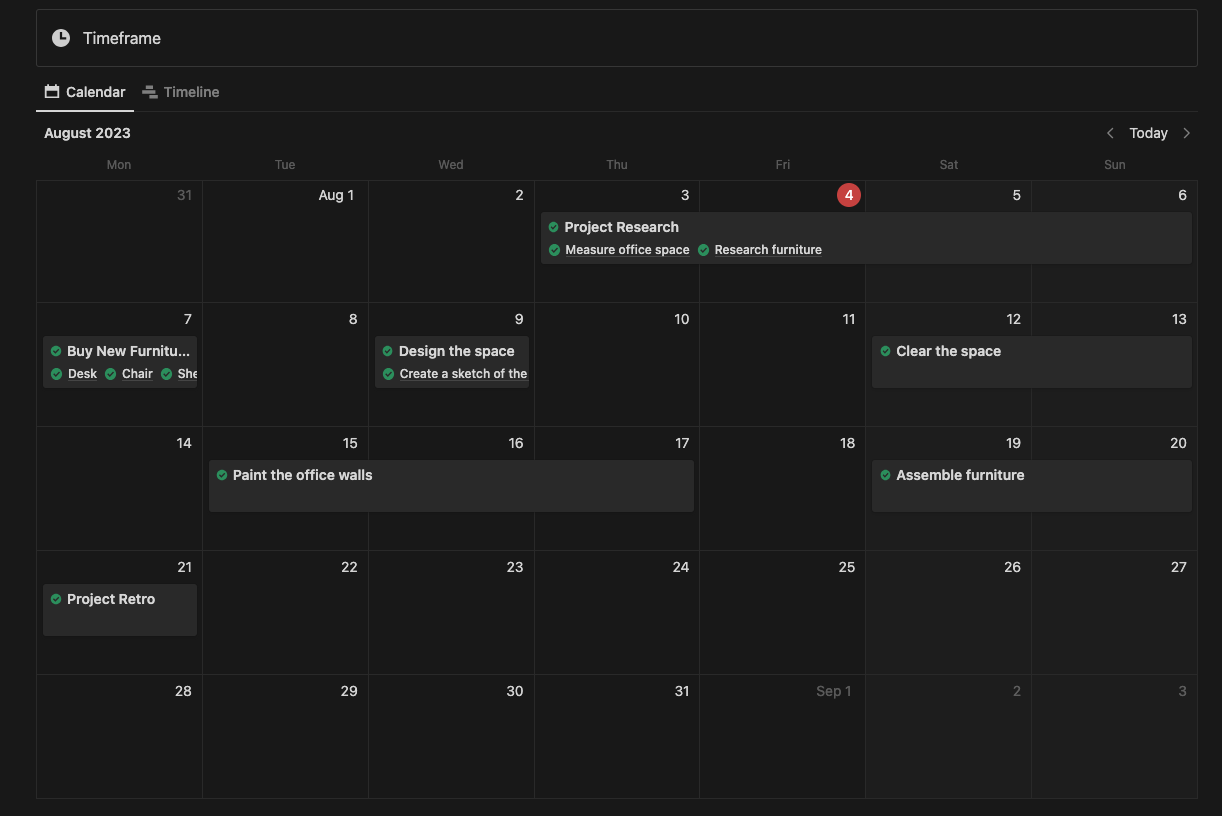
Project Task Calendar View in Notion Project Management Kit
The Blockers view shows tasks related that are incomplete, are other being blocked or blocking another task and have an Action Date assigned to them.
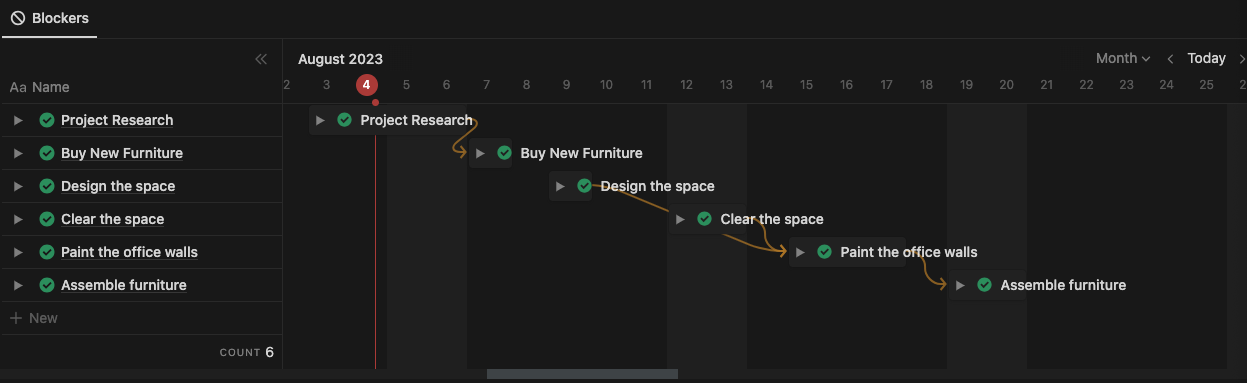
Blockers view in Notion Project Management Kit
Project Library
This section shows all resources related to a project and has several views:
To Do: This table view shows all resources related to a project that have not yet been marked as complete.
Done: This table view shows all resources related to a project that have been marked as complete.
All: This gallery view shows all resources related to a project.
Project Notes
This section of the project template shows all of the files and individual notes related to the project. Notes are explored in more detail in the Notes Database guide.
Project Scope
The Project Scope section is nested within a toggle. This section is designed to be completed before you commence work on the project. Completing the project scope section will help determine what tasks need to be added to the project and what a realistic project timeline would look like.
Within the toggle you will find the Project Timelines and Project Details. The Project Timelines section shows a timeline visual of the Projected, Revised and Actual project timelines. The Project Details view is where you add project notes. Project notes are divided into 3 categories:
Notes: Notes can be used to capture general observations, details or other information about the project.
Scope: This is where you define what needs to be completed to consider the project completed. Scope is subdivided into
Must,Should,Could&Won’t Doitems. Prioritising your deliverables will help you determine the essentials needed to complete your project. Non-essential items could be implemented if you have sufficient resources or could be considered for a future project version. This is explored further in the Previous Version section.Risks: Risks associated with the project can be highlighted here.
Decisions: Keep a log of decisions made and reasons why during the project
Project Retro
The Project Retro toggle contains the Project Health Check, Project Details, Reflections and Next Steps views. The Project Health Check highlights the differences between your Projected, Revised and Actual timelines by start date and by duration. The Project Details view will contain all of the Notes you added within your Project Scope you can mark all that have been addressed with the Addressed checkbox so that they are not carried into the next project version. Under Reflections you can make note of what you learned from this project by identifying what went well and what can be improved going forward. In Next Steps, you can add any remaining action items that need to be completed before ending the project. You can create the next project version from here as well.
Previous Version
The Previous version toggle shows note items that were not addressed in the previous project. These can be added to your current project scope as appropriate. You can also view any reflections taken away from completing the previous project version to help form your project planning.