Automating Notion Relations with Make.com
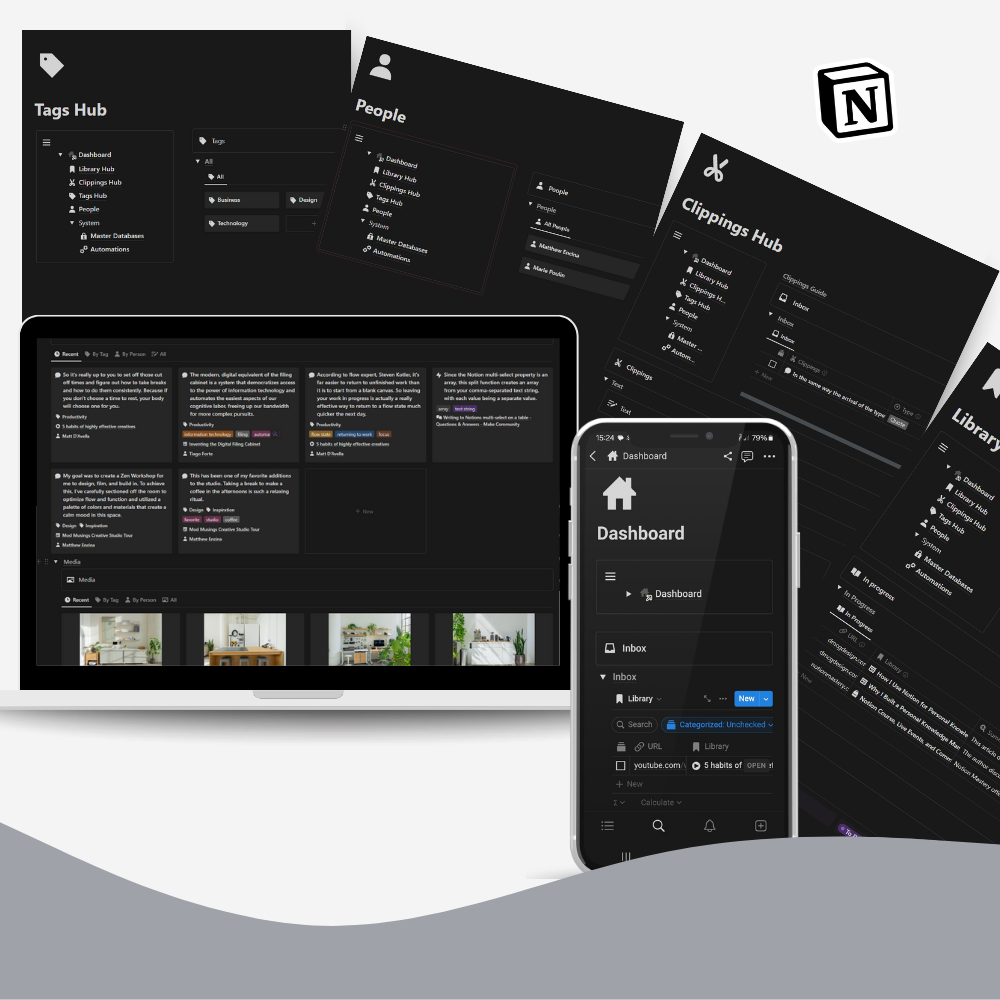
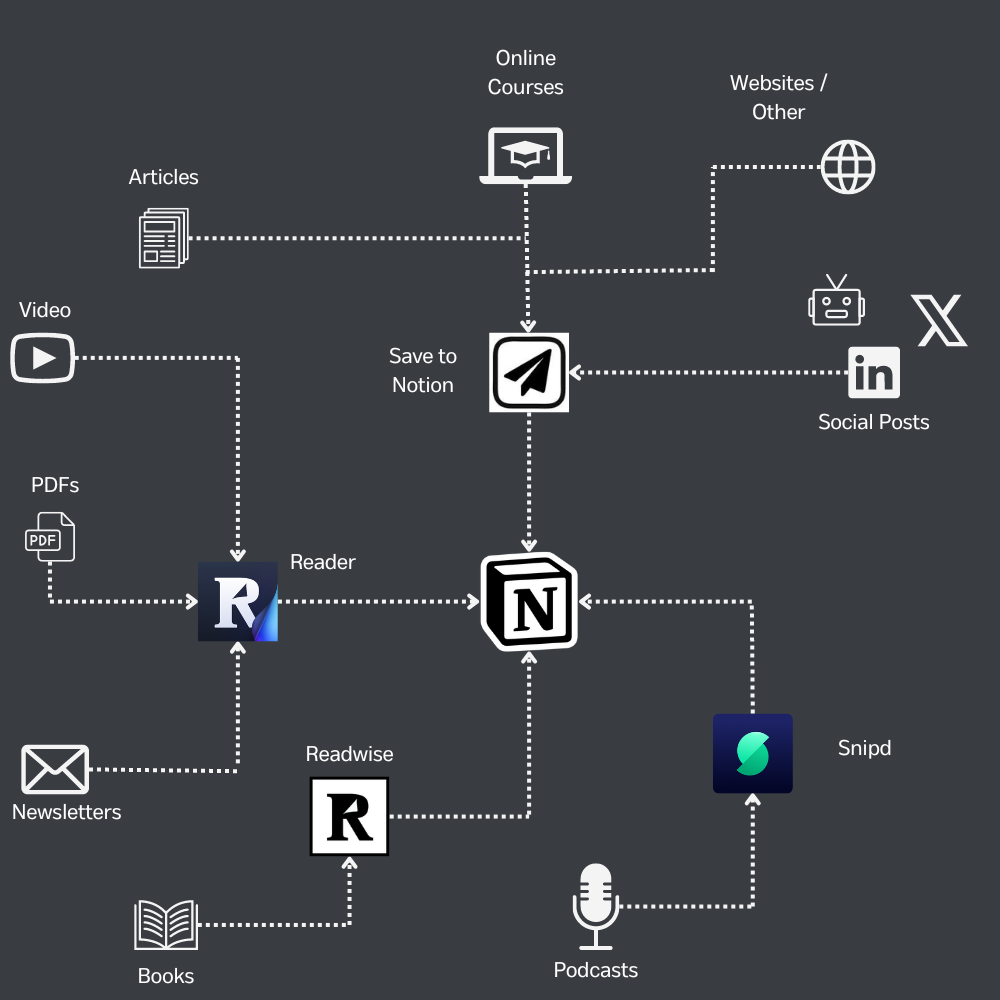
As part of my personal knowledge management system in Notion, I capture resources, like articles, videos, documents etc. into my Library Database and I distill those resources into individual clippings in my Clippings Database. Clippings are the key quotes or takeaways I take from an individual resource. I have a series of blog posts on how and why I use a Personal Knowledge Management System in Notion here if you’re interested.
One of the areas you can lose a lot of time when it comes to a PKM system is organising your data. You could spend hours day after day meticulously organizing your data and find you never actually have them time to apply the knowledge your organizing to improve your work. I’ve already spoken a lot about how I find the balance in organising my knowledge so I won’t dive into it further here. One of the rules I try follow for this type of administrative work is to automate as much as possible.
For some context, the Clippings and Library databases have their own relations to other databases in my workspace. Like the People, Tags and Project databases for example. About 90% of the time these relations will be identical. The clipping will be attributed to the author of the article and the general theme will be similar, so they fall under the same tag. So why use 2 separate relations? You could use one relation and simply create a rollup for the other database. Problem solved. That’s true, except for the 10%. The 10% of the time where you want to attribute a quote to someone else. The guest on the podcast - not the host. Or, the 10% of the time where the clipping inspires an idea for a completed unrelated project to the one you were researching. Maybe you want to attribute a quote to the book’s character who spoke it, and not the author. That 10% is a real pain. It more than doubles the amount of time that it takes to process clippings and library items because there’s separate relations. That’s why I’ve automated this step using Make.
I built a simple automation that checks my clippings inbox (uncategorized clippings). Finds their Library relation (which was added using the Notion button automation) and creates the same relations. So the clipping is attributed to the author and the tags are the same. Great! For 90% of the time I don’t need to do anything more, I can just mark the clipping as categorized in my inbox and it’s done. For the 10% of the time where there’s going to be a difference between the clipping and it’s source, I have the freedom to edit it. That’s because we’re using a separate relation property as opposed to a rollup of the library relation. With a pretty basic automation, I’ve reduced the time it takes to process this by 90% and still have the freedom for that customization where it mattes. Here’s how it works:
Step 1: Turn your key quotes into clippings.

As you’re reading through an item in your Library you can convert text to a Clipping. Isolate the text in a single text block and simply turn it into a page in your Clippings database. The benefits of this approach is simple, while creating the page in the correct clippings database you’re also left with a link to the page directly where it’s been sourced from. Having these backlinks in place are super helpful if you ever want to refer back to the original context of a quote for example.
To turn a block into a page into in the Clippings database:
- Right click the block and use the *turn into page in* option.
- Select your Clippings Database
Alternatively:
- Press cmd/ctrl + option/shift + 9 (Mac/Windows) to turn a block into a page
- Press cmd/ctrl + option/shift + P to move that to another database.
- Select your Clippings Database
Using the keyboard shortcuts moves the page entirely, so you don’t have the same backlink options. However you can always @ the page title to create a page link that way.
Step 2: Relate the clippings to their source

If you’re using my Knowledge Management Kit Template, step 2 is simple. Click the Clippings > Library Relations button on your library item page. If you haven’t purchased the template here’s how you can create a similar automation in your own system.
Here is how you can create a 'Second Brain Library Relation & Archive Button' in Notion:
1. Add the relevant properties to your clippings database. The filters I use are that the Categorized and Has Library Relation checkboxes are unchecked.
A. I explain how the categorized property works in my system here if you’re interested. But essentially, you would use whatever filters you like to determine if your clipping is already categorized/organized.
B. The Has Library Relation property is a formula property with a super simple if function to check if your clipping already has something in the Library relation property, populated. If it’s populatsed (not empty). The Has Library Relation property is checked. The formula is:
if(empty(prop("Library")), false, true)
2. Add a button block to your page and click on the gear icon to configure it. You can add the button to the default template page of your library database so it appears on each new page added to your database.
3. Add a step to the automation to edit pages in your Clippings database. The filters I use are that the Categorized and Has Library Relation checkboxes are unchecked.
These properties allow the automation to check for uncategorized clipping that don’t already have a library relation and relate them to the currently library page. The only minor limitation, is that it assumes you are running this automation for each item in your library that you consume. For example, let’s say you read an article (Article 1), create a bunch of clippings and jump straight into reading a second article (Article 2). When you create clippings from the second article and press the button, clippings from Article 1 and 2 will all be related to Article 2. This is easily avoided by pressing the button, every time you finish your article but if you ever make the mistake you can always fix retroactively. This is easily done in the inbox view of the Knowledge Management Kit template.
4. Select the property you want to be edited for the pages in your Clippings database. In this case that would be the Library relation and you want to add the dynamic option ”This page”, especially if working within a template page.
5. [Optional] Add an additional step to the automation to edit the current library page by changing the Status property to Archived.
6. Click 'Done' to finish setting up the button.
Now, whenever you click on the 'Clippings > Library Relation & Archive' button, it will automatically create a relation to your newly created clippings to the current library page, and then archive that library page.
Step 3: Login to Make.com
- If you haven’t already created an account, you will be prompted to do so. Click create new scenario and click the plus icon on the screen to add a new node.
Step 4: Check your Clippings Inbox
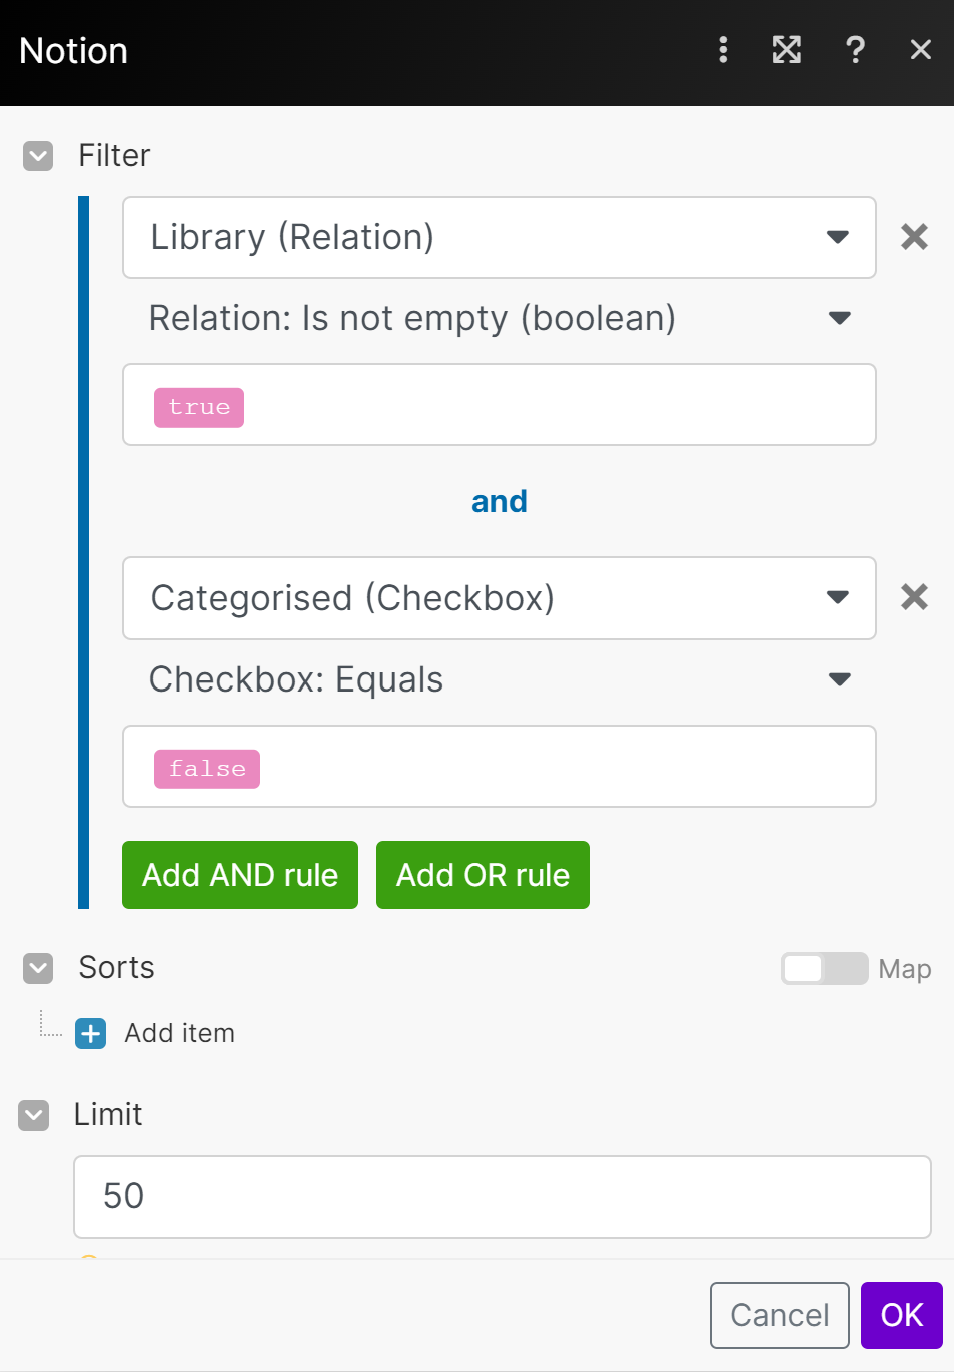
Once you’ve added a new scenario, click the plus icon and search for Notion. Under the available Notion options select a Search Objects module. I call this module; Check Clippings Inbox. Under Search Objects select Database Items, if it’s not already selected, under Database ID, search for you Clippings Database. You may need to set up your Make to Notion connection if you have not done so already
- Add filters so that the automation is looking for Clippings that have a Library relation but are not categorized.
- Select your Library relation property and under relation select Is not empty and set the value as True.
- Add an And Rule to create a second filter.
- Select your Checkbox property and under Checkbox select Equals and set the value to True.

Step 5: Find Related Library Item
The next node in the automation flow is another Notion Search Objects module. This one will be connected to your Library database. You can call this Find Related Library Item. If the first module, is finding clippings that have a library relation but are not categorized, this module is finding the library item for those uncategorized clippings.
- Under Search Objects select Database Items, if it’s not already selected. Under Database ID, search for you Library Database and select it.
- Select your Clippings relation property and under relation select contains. In Search Items add the Page ID from Module 1 (Check Clippings Inbox).
Step 6: Update Clippings
In Step 4, we found our uncategorized clippings that have a library relation. In step 5, we found those specific library relations in our library database. We can now map the values from our library item to our clippings item.
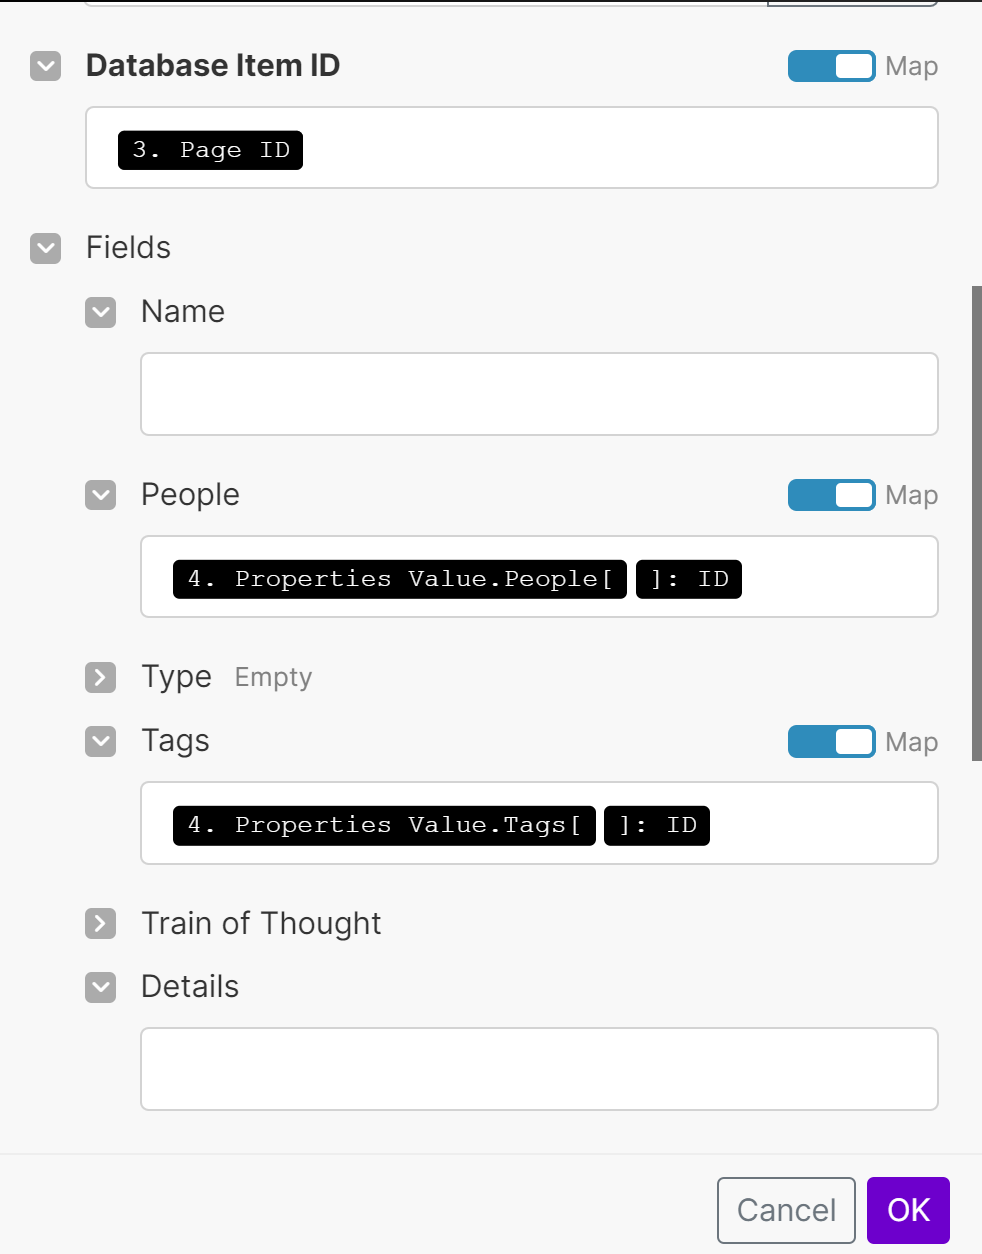
- Add a Update Database Item module as the final node in our automation flow.
- Under Database ID, search for you Clippings Database and select it.
- Under Database Item ID, select the Page ID from Module 1 (Check Clippings Inbox). This is your clipping.
- Select the fields for the clipping you would like to update. In my case, I have chosen relation properties to my other databases; People and Tags. You can use whatever properties you want but I’ll use the People relation property as an example here.
- In the People relation field, open the search items and go to the Find Related Library Item module and go down through the list until you find Properties Values. Open that toggle and search for People. Open the People toggle and select ID.
- Repeat for additional database properties.
Step 7: Create a filter for > 0
There’s one last step to take, which is important to prevent you getting error reports on your automation. What happens if the automation runs and at step one it finds 0 clippings that are uncategorized and have a library relation. The automation will proceed to step 2 and you’ll get an error.
To prevent this, we can add a filter between module 1 and 2 in our flow.
Click the wrench icon between the 2 module and select Set Up a Filter.
Set the Condition for Total Number of Bundles in Module 1 to be greater than 0. (Under numeric operators, select Greater than and enter 0).
That’s it you’ve mapped the data from your source, like tags and people to the corresponding properties on the individual clippings. This will remove a significant chunk of the organizing and processing involved but still allow you the freedom to edit clippings individually when required. If you want to try my Notion Knowledge Management Kit template you can access it here: